
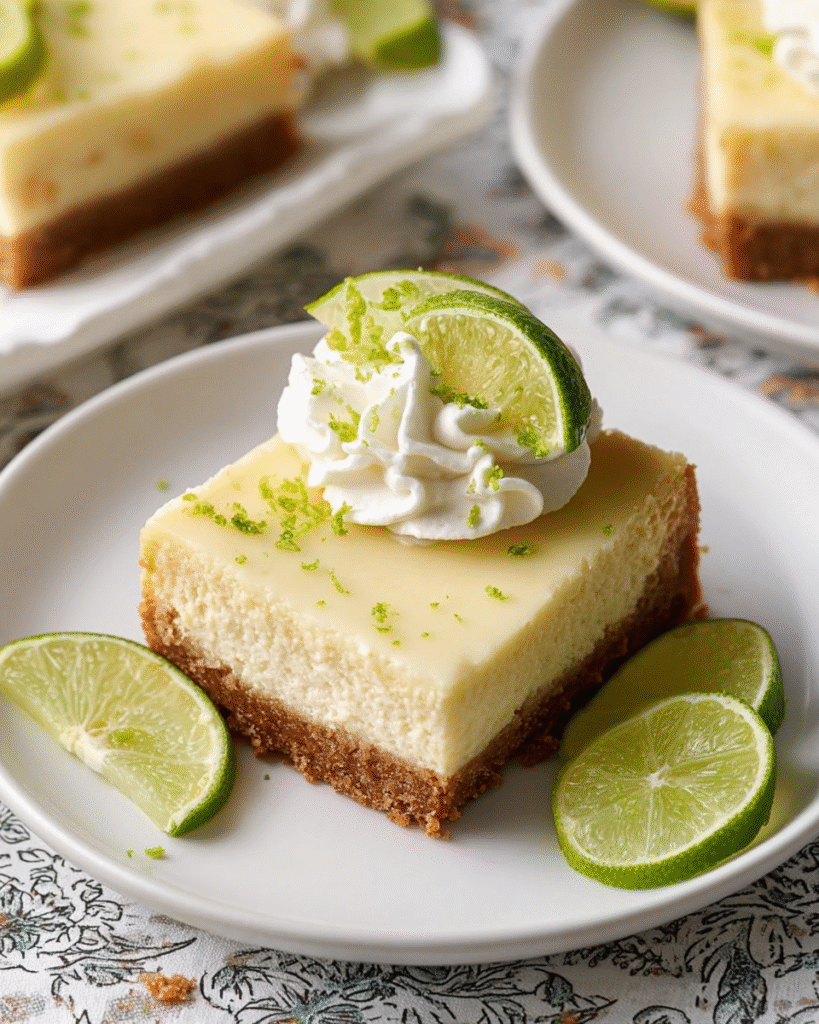
Key Lime Cheesecake Bars deliver the perfect fusion of creamy cheesecake and tangy citrus flavor in every handheld square. Imagine biting into a buttery graham cracker crust that gives way to a velvety, bright lime-infused filling—refreshing, portable, and elegantly simple. This guide invites you into a complete approach that equips you to bake these bars with confidence and finesse, from equipment essentials to expert tips that elevate your dessert game.
Overview of Key Lime Cheesecake Bars
These bars are a clever mash-up: a cheesecake meets Key lime pie in dessert form, wrapped in a buttery graham cracker crust and served in neat portions. The neutral base absorbs zesty lime while still offering enough creamy richness. They strike a balance between sweet and tart, creamy and crisp, and deliver a more portable alternative to a classic pie or round cheesecake. Perfect for summer evenings, festive gatherings, or anytime you crave citrus-driven indulgence.
Brief History & Cultural Significance
The Key lime has been a star of Florida’s culinary scene since the late 19th century, when sponge fishermen began baking pies using limited onboard ingredients: sweetened condensed milk, egg yolks, and the small, aromatic Key lime. Over time, bakers introduced cream cheese into the mix, lending cheesecake-like texture and tang. Southern cooks and home bakers adapted the recipe into bar form—easier to serve yet still decadent. Today, Key lime cheesecake bars enjoy a cult following in Southern cookbooks, summer recipes, and dessert menus across the U.S., offering both nostalgia and modern appeal.
Preparation & Tools to Use
Prep, Cook, Chill, Total Time, Servings, Yield
Use this guide to organize your baking flow:
- Prep: ~20 minutes
- Bake (or no-bake rest): ~30 minutes
- Chill: ~3–4 hours (or overnight for clean slicing)
- Servings: 16 bars (based on 9×9 pan)
- Yield: 16 generous portions
Essential Tools and Equipment
- Square baking pan (8–9″) – creates perfect bar shapes and ensures even baking
- Parchment paper – builds a sling for easy bar removal
- Electric mixer or stand mixer – achieves smooth, blended filling
- Microplane or zester – for fresh lime zest without bitter pith
- Citrus juicer or reamer – extracts fresh juice efficiently
- Measuring cups and spoons – for precise baking
- Rubber spatula and offset spatula – for mixing and smoothing
- Fine-mesh strainer (optional) – to catch pulp or seeds
Why Each Tool Matters
- Pan choice ensures bitesize consistency and professional presentation.
- Parchment sling means no knife scraping, clean lifting, and beautiful edges.
- Mixer eliminates lumps and over-mixing risk—critical for smooth texture.
- Zester keeps white pith out of the filling, preserving bright citrus notes.
- Juicer yields maximum lime juice with minimal effort and waste.
- Spatulas enable careful folding and topping, while avoiding air pockets that cause cracks.
Ingredients List & Substitutions
Graham Crust
- 1¾ cups graham cracker crumbs (about 12 full sheets)
- ¼ cup granulated sugar
- 6 tablespoons unsalted butter, melted
Cheesecake Filling
- 16 oz cream cheese (2 blocks), room temperature
- ½ cup sour cream or Greek yogurt
- 1 cup sweetened condensed milk
- ¾ cup granulated sugar
- 2 large eggs + 1 large egg yolk, room temperature
- ½ cup key lime juice (fresh or bottled but preferably fresh)
- Zest of 2–3 key limes (≈ 2 teaspoons)
- 1 tsp pure vanilla extract
- Pinch of fine salt
Optional Garnishes
- Whipped cream
- Extra lime zest or thin lime slices
- Fresh berries (raspberries or blueberries)
- Shredded coconut or toasted macadamia crumbs
Ingredient Substitutions
- Use Persian limes if Key limes are unavailable (slightly milder).
- Swap sour cream with Greek yogurt for tang and lighter texture.
- Choose gluten-free graham crackers for dietary needs.
- For no-bake, reduce sweetened condensed milk and omit eggs—chill instead of bake.
Step‑by‑Step Instructions
1. Preheat and Line the Pan
- Preheat oven to 325 °F (163 °C).
- Line an 8×8 or 9×9 inch pan with parchment paper, allowing excess overhang on two opposite sides to form a sling for easy removal.
2. Make and Bake the Crust
- In a mixing bowl, combine graham cracker crumbs and sugar.
- Stir in melted butter until crumbs are evenly moistened and hold together when pressed.
- Firmly press the mixture into the bottom of the lined pan using a flat-bottomed cup or spatula.
- Bake for 8–10 minutes, until lightly golden. Remove from oven and cool while preparing the filling.
3. Prepare the Filling
- Keep mixer speed low. Beat cream cheese until smooth and no lumps remain.
- Add sour cream (or yogurt), condensed milk, and sugar. Mix until creamy.
- Scrape down the sides before adding eggs and yolk, one at a time—mix just until combined.
- Add lime juice, zest, vanilla, and salt. Mix until fully smooth—avoid over-mixing to prevent cracks.
4. Bake or Set Filling
- To Bake: Pour filling over cooled crust. Bake 20–25 minutes, until edges are set and center gently jiggles when nudged. Avoid over-baking to keep creamy texture.
- No-Bake Variation: Skip baking. Pour filling over crust, then cover and chill for at least 4 hours, preferably overnight.
5. Chill and Slice
- Cool bars to room temperature, then refrigerate for at least 3 hours (overnight for best slicing).
- Lift bars using parchment sling. Place on cutting board. Use a sharp knife (warmed under hot water, dried) to make clean cuts.
- Wipe blade between cuts. Refrigerate again to reset before serving.
6. Garnish and Serve
- Top each bar with a dollop of whipped cream, a sprinkle of lime zest, and berries or coconut/macadamia bits, if desired.
- Serve chilled or slightly softened for best flavor and texture.
Tips for Smooth Results
- Ensure all ingredients are room temperature—this prevents a grainy texture.
- Zest before juicing to avoid drying out your limes.
- Smear filling carefully to avoid air bubbles; tap pan gently before baking.
- Bake at lower temperature and avoid over-baking to maintain creaminess.
- Chill fully before cutting to get clean, professional-looking bars.
Side Dish Recommendations
Pairing your key lime cheesecake bars with thoughtfully selected sides can enhance both their flavor and presentation. These suggestions range from fresh accompaniments to indulgent drizzles, adding contrast and harmony to the citrus-forward dessert.
Fresh Berry Parfait
A simple parfait layered with fresh berries and whipped cream offers a sweet and tart counterpoint. The berries’ natural acidity complements the lime’s brightness, while the whipped cream adds smoothness without competing with the cheesecake’s texture.
Tropical Fruit Salsa
A chilled salsa made with diced mango, pineapple, kiwi, and mint provides a juicy, slightly spicy kick. It’s colorful and refreshing—ideal for outdoor gatherings or summer parties.
Coconut-Macadamia Salad
A light fruit salad sprinkled with toasted macadamia nuts and shredded coconut balances crunch and creaminess. This side plays beautifully with the tropical undertones of the cheesecake filling and crust.
Mint-Lime Sorbet
A palate-cleansing sorbet made with mint and lime juice refreshes the taste buds. It’s especially fitting when served between multiple desserts or as a contrast to the bars’ rich filling.
Hibiscus Iced Tea
Bright red and slightly floral, hibiscus tea (served iced) is both a visual and flavor contrast. It enhances the citrus elements while balancing sweetness with a tart, earthy base.
Salted Caramel Drizzle
A drizzle of salted caramel over the bars—or served on the side for dipping—offers a buttery-sweet depth that contrasts beautifully with the tart lime flavor.
Coconut Macaroons
Chewy, sweet, and golden brown, coconut macaroons complement the bars by adding texture and a toasty finish. Consider dipping them in white chocolate for an even richer pairing.
Key Lime Cheesecake Trifles
Using a few extra bars, layer small glasses with crushed graham crackers, bits of cheesecake bar, and whipped topping for a stunning dessert trifle variation. It repurposes leftovers in an elegant way.
Nutritional Information & Health Benefits
Understanding the nutritional profile of key lime cheesecake bars helps home bakers tailor servings to their dietary needs. Each component—from the crust to the filling—adds distinct value, flavor, and impact on macronutrients.
Per Bar (Estimated)
- Calories: Approx. 280–310
- Total Fat: 14–16g
- Saturated Fat: 8g
- Carbohydrates: 30–34g
- Sugar: 22–26g
- Protein: 5–7g
- Sodium: 140–180mg
- Cholesterol: 45–60mg
Micronutrient Highlights
- Vitamin C: From lime juice and zest; supports immune health.
- Calcium: Found in cream cheese and yogurt or sour cream; important for bone strength.
- Vitamin A: Present in egg yolks and butter; supports vision and skin health.
- Magnesium & Potassium: Trace minerals from citrus and dairy ingredients.
Lightening Options
To reduce fat or calories without sacrificing flavor:
- Use Greek yogurt in place of sour cream.
- Opt for low-fat cream cheese.
- Substitute sugar alternatives like monk fruit or erythritol.
- Choose a gluten-free or oat-based crust for those with dietary restrictions.
- Reduce serving size while offering fruit pairings to stretch the portions without excess calories.
Special Diet Modifications
- Vegetarian: The bars are naturally vegetarian, containing no gelatin or animal-based thickeners.
- Gluten-Free: Use certified gluten-free graham crackers or almond flour for the crust.
- Dairy-Free: Swap in dairy-free cream cheese and coconut yogurt; note that texture may vary.
- Egg-Free: Use cornstarch and dairy as thickening agents in a no-bake variation if avoiding eggs.
Common Mistakes to Avoid & How to Perfect the Recipe
Success with key lime cheesecake bars depends on precision and understanding of a few essential baking principles. Avoiding the most frequent missteps can dramatically improve texture, appearance, and flavor.
Over- or Under-Mixing the Filling
Mistake: Over-mixing can incorporate too much air, leading to cracks. Under-mixing leaves lumps and uneven texture.
Solution: Use low-speed mixing. Blend just until smooth and uniform—especially after adding eggs.
Skipping the Room Temperature Rule
Mistake: Cold cream cheese or eggs can cause uneven blending, leading to a curdled filling.
Solution: Bring all dairy and eggs to room temperature at least 30 minutes before baking.
Incorrect Crust Proportions
Mistake: Using too much or too little butter makes the crust either greasy or too dry.
Solution: Mix crumbs with just enough butter so they hold shape when pressed. Pack tightly and evenly into the pan.
Using Bottled Lime Juice
Mistake: Bottled lime juice can taste bitter and lacks the bright acidity of fresh juice.
Solution: Use freshly squeezed key lime juice when possible. If using bottled, select a high-quality brand without preservatives.
Overbaking
Mistake: Baking too long causes the bars to crack, dry out, or turn rubbery.
Solution: Watch for set edges and a slightly jiggly center. Remove promptly and cool gradually.
Slicing Too Soon
Mistake: Cutting bars before they’ve chilled leads to messy edges and broken centers.
Solution: Chill for at least 3 hours, ideally overnight. Use a warm, clean knife for neat slices.
Ignoring Pan Preparation
Mistake: Not lining the pan leads to difficult removal and uneven pieces.
Solution: Use parchment with overhanging edges for a clean lift-out. Grease lightly if needed for non-stick pans.
Substituting Without Testing
Mistake: Swapping ingredients without proportion changes (e.g., yogurt for cream cheese) can alter texture and flavor.
Solution: Stick to tested swaps or make small test batches. Read labels for moisture content and fat levels.
Freezing the Wrong Way
Mistake: Freezing bars uncovered leads to ice crystals and flavor loss.
Solution: Wrap each piece tightly in plastic wrap, then foil, or store in airtight containers.
Ignoring Garnish Balance
Mistake: Overloading with sweet toppings can overwhelm the lime flavor.
Solution: Use garnish sparingly—whipped cream, zest, or a fresh berry is plenty.
Tips, Notes, Storing & Reheating
Expert Tips for Success
- Zest before juicing your limes. It’s much easier and avoids waste.
- Roll your limes on the counter before cutting to maximize juice yield.
- Room temperature ingredients are essential for a smooth filling and cohesive texture.
- Use a low speed mixer to avoid incorporating too much air, which can lead to cracks.
- Tap the pan gently on the counter before baking to release any air bubbles in the filling.
- For a professional finish, smooth the top with an offset spatula before baking.
- If making ahead, chill the bars fully before slicing to ensure clean cuts.
- Use a sharp, hot knife for slicing—dip in hot water, wipe clean between each cut.
Notes on Variations
- Coconut Crust: Replace graham crumbs with a mix of coconut and crushed vanilla wafers for a tropical flair.
- Macadamia Crunch: Add chopped macadamia nuts to the crust for a nutty twist.
- Chocolate Swirl: Marble a thin layer of dark chocolate into the cheesecake filling for extra richness.
- Mini Bites: Use a mini muffin pan for bite-sized cheesecake cups with cupcake liners.
- Spice It Up: Add a pinch of cinnamon or cardamom to the crust for a warm spice note.
Storing the Bars
- Refrigerator Storage: After baking and cooling, cover the bars tightly in the pan or transfer to an airtight container. Store in the fridge for up to 5 days.
- Freezer Storage: Once bars are fully chilled, slice them and wrap each bar in plastic wrap. Then, place wrapped bars in a freezer-safe container or zip-top bag. Freeze for up to 2 months.
- Thawing: Remove bars from the freezer and thaw overnight in the refrigerator or for 1–2 hours at room temperature before serving.
Reheating or Serving
- Serving Cold: These bars are best served chilled directly from the fridge.
- Room Temp: If you prefer a softer texture, let the bars sit at room temperature for 10–15 minutes before serving.
- Avoid Microwaving: Reheating in the microwave is not recommended as it can affect texture and cause the bars to weep or collapse.
Frequently Asked Questions
Can I use regular limes instead of key limes?
Yes. While key limes have a unique tartness, regular Persian limes work well. The flavor will be slightly less intense, but still delicious.
Can I make these without baking?
Absolutely. For a no-bake version, omit the eggs and reduce the sweetened condensed milk slightly. Chill the assembled bars for at least 4 hours or until fully set.
What’s the best way to slice the bars cleanly?
Use a sharp knife dipped in hot water and wiped dry between each cut. For the best result, chill the bars overnight before slicing.
How can I prevent cracks in the filling?
Avoid over-mixing the batter, especially after adding the eggs. Don’t overbake—remove the bars while the center is still slightly jiggly.
Can I make these gluten-free?
Yes. Use gluten-free graham crackers or an almond flour crust. Be sure to check that all other ingredients are certified gluten-free.
Can I substitute sour cream with yogurt?
Yes. Greek yogurt is a great substitute for sour cream, offering similar texture with a tangy note and added protein.
Are these suitable for freezing?
Yes. Slice first, then wrap each bar individually in plastic wrap and store in an airtight container. Thaw in the refrigerator or at room temperature before serving.
What toppings work well?
Try a dollop of whipped cream, fresh berries, shredded coconut, or thin slices of lime. Avoid overly sweet toppings that may compete with the tart filling.
Can I double the recipe?
Yes. Use a 9×13 pan and adjust the baking time slightly. Check for doneness by gently shaking the pan—edges should be set and the center should jiggle slightly.
Can I use bottled lime juice?
You can, but it’s best to choose high-quality bottled juice with no additives. Fresh lime juice offers brighter, more authentic flavor.
Conclusion
Key Lime Cheesecake Bars are the epitome of a well-balanced dessert: creamy yet tart, rich yet refreshing, elegant yet easy to prepare. They bring together the best of two beloved desserts—cheesecake and key lime pie—in a format that’s perfect for sharing, gifting, or enjoying solo with a cup of tea.
From understanding the cultural roots of the key lime to selecting the right tools and mastering the texture, you’ve now gained all the insights needed to create these citrusy delights with confidence. Whether served at summer picnics, family holidays, or casual dinners, they’re sure to impress both guests and your own taste buds.
With versatile variations and make-ahead convenience, these bars fit any baker’s repertoire. Stick to the classic or customize with your favorite garnishes and crusts—the foundation is solid, and the possibilities are endless.
Now it’s your turn. Whip up a batch, chill them to perfection, and enjoy every tangy, creamy bite.


Leave a Comment