
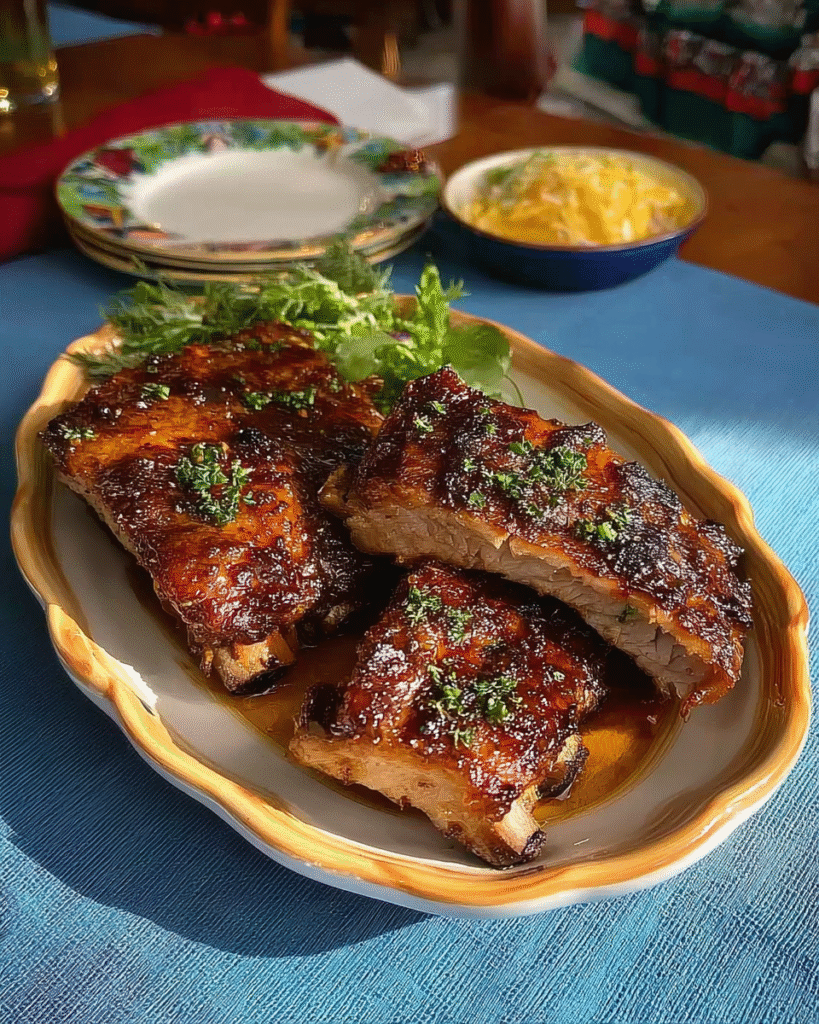
Few things scream “American summer” quite like a rack of BBQ baby back ribs. Smoky, juicy, sticky, and tender, these ribs are the heart of backyard gatherings, tailgate parties, and late-night feasts. They embody a rich culinary tradition rooted in both technique and patience.
Whether you’re a seasoned pitmaster or a backyard grill novice, mastering baby back ribs is a badge of honor. The balance of heat, time, smoke, and seasoning creates a masterpiece that’s well worth the effort. From classic dry rubs to tangy glazes and bold spice mixes, these ribs adapt to every taste and style.
This guide takes you deep into the art and science of BBQ baby back ribs—tracing their history, dissecting regional differences, walking through essential prep steps, and guiding you in using the right tools. No shortcuts. Just the best ribs you’ve ever made.
What Are Baby Back Ribs?
Baby back ribs come from the top part of the pig’s ribcage—near the backbone and under the loin muscle. They’re shorter, more curved, and meatier than spare ribs. These ribs have a distinctive arc and are highly prized for their tenderness and flavor when cooked low and slow.
Their leanness makes them ideal for smoking or slow baking. With less fat than spare ribs, they cook faster and absorb marinades, rubs, and smoke flavor exceptionally well. Their size also makes them easier to handle and serve.
Despite their name, “baby” doesn’t refer to the age of the pig—it refers to their smaller size compared to spare ribs. This cut is incredibly popular in both home cooking and competition BBQ scenes.
A Brief History of Barbecued Ribs
Barbecued ribs are steeped in American culinary history, with roots stretching back to the 19th century. Pork has always been a cornerstone of Southern cooking, and ribs—once considered scrap cuts—became the highlight of communal meals, church picnics, and smokehouse feasts.
Over time, different regions developed distinct barbecue styles:
- Memphis: Known for dry rub ribs and vinegar-based mops. You’ll often find baby backs served “dry” without sauce, relying on a spice rub alone.
- Kansas City: Famous for sweet, sticky sauces made from tomato and molasses. Ribs are generously basted.
- Texas: Mostly beef country, but pork ribs are smoked with simple salt and pepper rubs over oak or mesquite.
- Carolina: Known more for pulled pork, but ribs here get the mustard or vinegar treatment.
Each region brings its own interpretation, but the slow-and-low cooking method remains consistent—a testament to the method’s power to transform tough cuts into tender bites.
Preparation Phase & Tools to Use
Essential Tools and Equipment
Before you touch a single rib bone, gather your tools. Quality equipment is just as important as technique in BBQ.
Smoker or Grill
You need a setup that allows for indirect heat. Whether it’s a charcoal grill, gas grill, offset smoker, pellet smoker, or ceramic kamado, it must maintain low, steady temperatures (225–275°F) for several hours.
Meat Thermometer
An instant-read or probe thermometer is critical. Baby back ribs are “done” around 190–195°F, but the collagen starts breaking down beautifully above 185°F.
Sharp Boning Knife
Used to trim the ribs and remove the membrane. A flexible, sharp knife gives precision when cleaning the rack.
Foil or Butcher Paper
Used in the “Texas crutch” or 3-2-1 method to wrap the ribs mid-cook, speeding up tenderness without drying them out.
Spritz Bottle
Spritzing the ribs during cooking keeps the exterior moist and encourages smoke adherence. Fill it with apple cider vinegar, apple juice, or even beer.
Rib Rack (optional)
A wire rib rack helps you smoke multiple racks upright if you’re cooking a large batch.
Importance of Each Tool
Each tool serves a specific role in achieving consistent, professional-quality results:
- Smoker: Delivers the flavor and gentle heat that defines BBQ.
- Thermometer: Prevents over- or undercooking. Ribs should never be guessed.
- Knife: Ensures clean prep and easy membrane removal.
- Foil: Locks in moisture during the cooking phase.
- Spritz bottle: Prevents bark from drying out or burning prematurely.
Investing in these tools will improve every batch of ribs you make and allow you to dial in your ideal flavor and texture.
Prep Time, Cook Time, Cool Time, Total Time, Servings, Yield
- Prep Time: 30 minutes
- Cook Time: 5 to 6 hours (depending on method)
- Rest Time: 15–20 minutes
- Total Time: ~6.5 hours
- Servings: 2–3 per rack
- Yield: One rack serves 2–3 people depending on sides
Ingredient Breakdown
Here’s the core list of ingredients used in traditional BBQ baby back ribs. Variations can include dry rub-only or glazed ribs, depending on your regional inspiration.
For the Rub
- 2 tablespoons brown sugar
- 1 tablespoon smoked paprika
- 2 teaspoons kosher salt
- 1 teaspoon black pepper
- 1 teaspoon garlic powder
- 1 teaspoon onion powder
- ½ teaspoon chili powder
- ½ teaspoon cumin
- ½ teaspoon mustard powder
For the Binder (Optional)
- Yellow mustard or Worcestershire sauce – helps the rub adhere
For Spritzing
- ½ cup apple juice
- ½ cup apple cider vinegar
- Optional: splash of bourbon or beer
For the Glaze (Optional)
- 1 cup barbecue sauce of choice
- 1 tablespoon honey or brown sugar
- 1 tablespoon apple cider vinegar
- Dash of hot sauce
Notes on Ingredients
- Brown sugar adds a caramelized crust when combined with smoke.
- Smoked paprika reinforces the BBQ flavor.
- Salt and garlic powder are non-negotiable base flavors.
- Binders help the rub stick better and improve surface texture.
- Spritzing is key for bark formation and moisture retention.
- Glazes should be applied at the end to avoid burning.
Step-by-Step Instructions
Step 1: Prep the Ribs
- Rinse the ribs under cold water and pat dry thoroughly.
- Flip the rack to expose the bone side. Slide a knife under the membrane (the silver skin) and lift gently.
- Use a paper towel to grip and peel the membrane off in one motion.
Step 2: Trim the Ribs
- Remove any large pockets of fat or excess meat hanging from the ends.
- Square the rack to improve presentation and even cooking.
Step 3: Apply the Binder
- Lightly coat the ribs with mustard or Worcestershire sauce.
- This step is optional but helps the rub adhere better.
Step 4: Apply the Dry Rub
- Combine all rub ingredients in a bowl.
- Pat—not rub—the mixture generously onto both sides of the ribs.
- Let the seasoned ribs rest at room temperature for 30–60 minutes.
Step 5: Set Up Your Smoker or Grill
- Preheat smoker to 225–250°F using your choice of hardwood (apple, hickory, cherry, or oak).
- For a charcoal grill, use the two-zone method with coals on one side and ribs on the other.
Step 6: Smoke the Ribs
- Place the ribs bone-side down on the grate.
- Smoke uncovered for 2–3 hours, spritzing every 45 minutes with apple cider mixture.
Step 7: Wrap the Ribs
- Lay out foil or butcher paper. Add a drizzle of honey, butter, and more rub.
- Place ribs meat-side down and wrap tightly.
- Return to smoker for another 1.5–2 hours.
Step 8: Finish and Glaze
- Unwrap ribs and return them to the smoker.
- Brush with BBQ sauce or glaze.
- Smoke uncovered for 30–45 more minutes to set the glaze.
Step 9: Rest and Slice
- Let ribs rest for at least 15 minutes.
- Slice between the bones and serve hot.
Smoking Baby Back Ribs
Smoking is the most revered method for cooking baby back ribs. It develops deep flavor, bark, and the tender bite BBQ lovers crave. The goal is low and slow heat combined with flavorful hardwood smoke.
Setting Up the Smoker
Begin by selecting the right type of smoker: offset, pellet, kamado-style, or water smoker. You’ll need to stabilize your temperature between 225°F and 250°F.
Use lump charcoal or hardwood as your heat source and add smoking wood for flavor. Popular wood choices include:
- Applewood: Mild, sweet smoke, ideal for pork.
- Cherrywood: Enhances color, adds a fruity note.
- Hickory: Stronger smoke flavor, traditional in Southern BBQ.
- Pecan or Oak: Balanced, robust flavor for all-purpose BBQ.
Arrange your smoker for indirect cooking. Ribs should not be placed directly over the fire. A water pan under the grill grates helps regulate temperature and moisture.
2-1-1 Smoking Method
This method works beautifully for baby back ribs. The name stands for:
- 2 hours unwrapped smoke
- 1 hour wrapped in foil
- 1 hour unwrapped with glaze
This method creates tender ribs without compromising bark or flavor. Start by smoking the ribs directly on the grates. Spritz them every 45 minutes with a mixture of apple cider vinegar and juice.
After two hours, wrap the ribs tightly in foil with a little liquid—such as butter, brown sugar, and a drizzle of honey or apple juice. This “crutch” speeds up the tenderizing process by trapping steam.
Once unwrapped, brush the ribs with BBQ sauce or glaze and return them to the smoker. This final phase sets the sauce, firms up the bark, and gives the ribs that glossy finish.
Final Touches
To avoid burning, apply the glaze in the last 30 minutes only. Watch closely for flare-ups. Let the ribs rest for 15 minutes before slicing between the bones.
Grilling Baby Back Ribs
Grilling ribs is perfect when you don’t have a smoker but want real BBQ flavor. Use either a gas or charcoal grill with a two-zone indirect heat setup.
Gas Grill Method
- Preheat one side of the grill to medium-low (275°F).
- Place ribs on the cool side.
- Use a smoker box or foil pouch filled with soaked wood chips placed over the active burner for smoke.
Cook the ribs bone-side down. Keep the lid closed and resist opening too often. Every 45 minutes, rotate the ribs and spritz.
After 2.5 to 3 hours, wrap the ribs in foil with a bit of butter, honey, or apple cider. Grill for an additional hour. Then, unwrap and glaze, cooking over direct heat for a brief 5–10 minutes to caramelize the sauce.
Charcoal Grill Method
- Use the snake method: arrange briquettes in a half-circle with chunks of wood layered along the line.
- Light one end to slowly burn across for several hours of steady heat.
Maintain 250°F and manage airflow via vents. Follow the same 2-1-1 structure. Place a drip pan beneath the ribs and spritz frequently to build bark.
Finish over direct heat briefly to char the glaze. Let rest before slicing.
Oven-Baking Baby Back Ribs
Oven-baking provides precision and is perfect when outdoor cooking isn’t an option. You won’t get the same smoky complexity, but you can still achieve tenderness and flavor with the right techniques.
Baking Instructions
- Preheat oven to 300°F.
- Season and wrap the ribs in foil or parchment lined with butter, apple juice, or vinegar.
- Bake on a baking tray for 2.5 to 3 hours.
You can check doneness by seeing how far the meat pulls back from the bones or using a thermometer to check for an internal temp around 190°F.
Once baked, carefully unwrap and discard excess liquid. Apply glaze and return to the oven at 400°F or broil for 5–7 minutes. Watch carefully to prevent burning.
Tips for Better Oven Ribs
- Use a wire rack over a pan to mimic airflow.
- Bake with a double wrap to prevent leaking.
- Add liquid to the wrap to maintain moisture.
- Finish with high heat to caramelize glaze.
Advanced Enhancements
For those looking to refine their technique or compete at the next level, consider the following strategies:
Spritz and Mop
Spritzing every 45 minutes with apple cider vinegar keeps the surface moist and supports smoke adherence. A mop sauce (thinner than BBQ sauce) can be brushed on during cooking for layered flavor.
Popular mop ingredients:
- Apple cider vinegar
- Beer
- Worcestershire sauce
- Paprika
- Garlic powder
This process adds acidity and penetrates the meat without breaking down bark.
Texas Crutch Foil Pack
Enhance the wrap step with butter, brown sugar, and honey. This mixture not only tenderizes the ribs but creates a deep flavor. Foil packs with steam help collagen break down, resulting in melt-in-your-mouth ribs.
Butcher Paper Wrap
Instead of foil, use unwaxed butcher paper to preserve more bark. It offers breathability, preserving smoke texture while still speeding up cook time.
Bark Management
To preserve the outer texture:
- Minimize sugar in the early rub if cooking at high heat.
- Avoid too much moisture on the surface early in cooking.
- Don’t re-wrap unwrapped ribs unless necessary.
A good bark should be dry, flavorful, and firm—not burned or sticky.
Sauce Strategies
Sauce can enhance or overpower ribs, depending on how it’s applied. Timing is everything.
Sauce Timing
- Early sauce: Can burn due to sugar content.
- Mid-cook sauce: Use thinner sauces with low sugar content.
- Final glaze: Applied 30 minutes before the end or just after.
Homemade Sauce Ideas
- Kansas City: Tomato-based, brown sugar, molasses, vinegar, chili powder.
- Memphis: Less sweet, with a kick of vinegar.
- South Carolina: Yellow mustard, vinegar, sugar, and spices.
- Texas-style: Bold tomato and pepper-forward, less sweet.
Experiment with layering multiple sauces: start with a tangy vinegar mop, glaze with a sweet Kansas City sauce, and finish with a brush of hot honey after slicing.
Avoiding Burnt Sauce
Use indirect heat. If cooking over direct flame, apply sauce during the final few minutes and watch closely. Burnt sugar ruins the flavor and texture of the bark.
Conclusion
BBQ baby back ribs are more than just a meal—they’re a symbol of slow-crafted tradition, a sensory celebration of smoke, spice, and tenderness. Whether you’re using a smoker, grill, or oven, the journey from raw ribs to perfectly caramelized, fall-off-the-bone deliciousness is one of patience, attention to detail, and passion for the craft.
Throughout this guide, you’ve learned how to:
- Choose and prep high-quality baby back ribs
- Master dry rubs, binders, and spritzing for maximum flavor
- Apply regional BBQ techniques for a personalized cooking style
- Control temperature and moisture whether smoking, grilling, or baking
- Make your own sauces and glazes from scratch
- Troubleshoot texture, moisture, bark, and finish
These methods aren’t just for a single recipe—they’re tools to evolve your barbecue journey. Customize your rubs, experiment with wood flavors, and refine your technique until every rack you serve draws silence and smiles.
Serve your ribs with sides that match your regional inspiration—classic coleslaw, cornbread, tangy baked beans, or grilled corn—and let the ribs remain the centerpiece of the table.
Whether you’re hosting a backyard cookout, entering a BBQ competition, or just feeding your family, perfecting baby back ribs is a skill that pays off every single time.
Final Tip
The best ribs aren’t just tender—they’re balanced. They hold together until bitten, with meat that gently pulls from the bone. They’re seasoned inside and out, kissed with smoke, and glazed with care.
So fire up your smoker, prep your rub, and make your next rack your best yet.
Happy smoking! 🍖🔥


Leave a Comment