
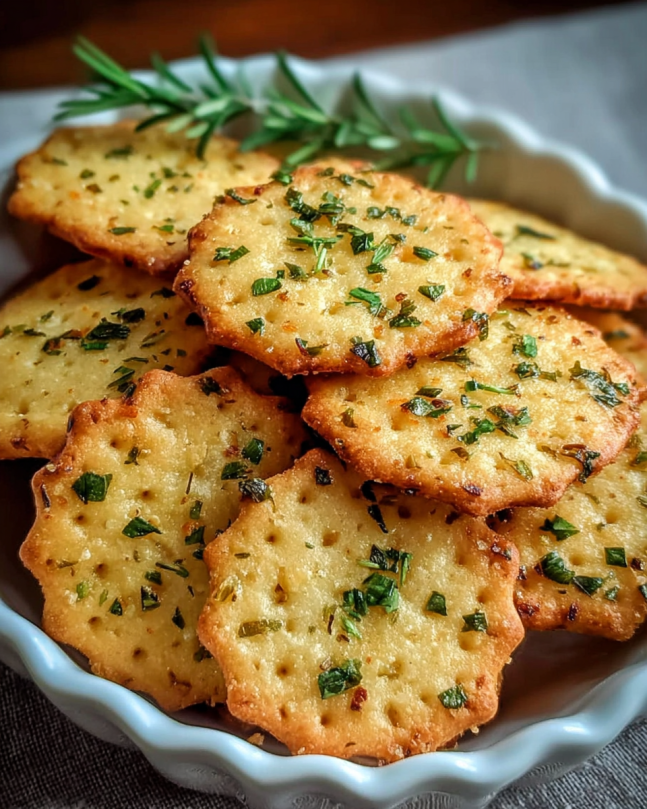
If you’re looking for a savory, crunchy, and wholesome snack, these garlic and herb chickpea flour snack crackers might become your new favorite. Packed with protein, naturally gluten-free, and loaded with herby-garlic flavor, these homemade crackers deliver a bold taste with every bite. Whether you’re on a special diet or just love experimenting with nutritious ingredients, these crackers offer a healthier alternative to store-bought options loaded with preservatives and refined flours.
Made from chickpea flour (also known as besan or gram flour), these crispy bites are rich in fiber and essential nutrients. They’re perfect on their own or served with dips like hummus, guacamole, or olive tapenade. Plus, they’re vegan, dairy-free, and nut-free, making them ideal for a wide range of dietary preferences.
From preparation to baking, this recipe is simple and quick enough to fit even the busiest lifestyles. Whether you’re making a snack for yourself, a party appetizer, or a healthy treat for your kids, these garlic and herb crackers are sure to satisfy.
Overview of Garlic and Herb Chickpea Flour Snack Crackers
Garlic and herb chickpea flour snack crackers are crunchy, baked snack bites made using besan (chickpea flour) mixed with aromatic seasonings and a little olive oil. These crackers are rolled thin, scored, and baked until golden and crisp.
They’re an excellent snack option for those on gluten-free, vegan, or low-sugar diets. Chickpea flour gives them a dense, nutty flavor and makes them protein-rich and naturally grain-free. The garlic and herbs infuse a Mediterranean essence that complements dips, soups, and cheeses beautifully.
This recipe is not only nutritious but also versatile. You can modify the seasoning, add toppings like sesame seeds or cracked pepper, and even turn them into crouton-style bits for salads.
Brief History and Cultural Significance
Chickpea flour has ancient roots. It’s been a staple in Indian cuisine for centuries, where it’s known as besan. In India, it’s used in countless recipes from savory fritters like pakoras to flatbreads like chilla. In the Mediterranean, similar uses are found in dishes like socca (France) and farinata (Italy), both thin chickpea pancakes baked in hot ovens.
Garlic and herbs—especially rosemary, thyme, and oregano—carry strong cultural significance in Mediterranean cooking. Their aromatic profiles have long been associated with rustic, home-style meals and nourishing diets.
Combining chickpea flour with garlic and herbs bridges these traditions, creating a snack that feels both modern and rooted in culinary history. It’s a global fusion of ingredients long prized for their flavor, nutrition, and accessibility.
Preparation Phase & Tools to Use
Prep Time; Cook Time; Cool Time; Total Time; Servings; Yield
- Prep Time: 20 minutes
- Cook Time: 15–20 minutes
- Cool Time: 10 minutes
- Total Time: 45–50 minutes
- Servings: 6
- Yield: Approximately 24 crackers
Essential Tools and Equipment
To ensure a smooth process, gather the following kitchen tools:
- Mixing bowl
- Whisk
- Measuring spoons and cups
- Silicone spatula or wooden spoon
- Rolling pin
- Parchment paper
- Baking sheet
- Pizza wheel or knife for scoring
- Pastry brush (optional)
Each tool plays a crucial role. The parchment paper prevents sticking, while the rolling pin ensures even cracker thickness for uniform baking. Scoring with a pizza wheel allows for cleaner cracker separation post-baking.
Importance of Each Tool
- Mixing Bowl & Whisk: Essential for uniform blending of dry ingredients
- Rolling Pin: Controls dough thickness, critical for crispness
- Parchment Paper: Prevents sticking and reduces cleanup
- Pizza Wheel: Efficient for scoring neat cracker lines
- Baking Sheet: Provides even heat distribution for a golden finish
- Pastry Brush: Helps evenly distribute water or oil across dough
Preparation Tips
- Use finely milled chickpea flour for a smoother dough. Coarser types may lead to gritty texture.
- Sift flour before mixing to remove lumps and improve consistency.
- Start with less water, adding more gradually until a pliable dough forms.
- Don’t over-knead; doing so may toughen the crackers.
- Roll between parchment papers to avoid sticking and for easy transfer.
- Thickness matters: ⅛-inch (3 mm) is ideal for crunchiness.
- Score before baking: this helps the crackers break apart cleanly later.
- Optional step: Let dough rest for 10 minutes for hydration and elasticity.
- Cool completely before storing, as trapped steam softens crackers.
- Store in airtight containers to preserve crispness.
Ingredients List (with Measurements)
Here’s what you’ll need to create these savory bites:
- 1 cup chickpea flour (besan), finely milled
- 1 teaspoon garlic powder
- 1 teaspoon dried mixed herbs (rosemary, thyme, oregano)
- ½ teaspoon salt
- ¼ teaspoon freshly ground black pepper
- 2 tablespoons olive oil
- ½ cup water (add more 1 tsp at a time if needed)
- Optional toppings: sesame seeds, chili flakes, flaky sea salt, fresh herbs
Ingredient Notes
- Garlic powder gives an even flavor distribution without raw bite.
- Dried herbs are more concentrated; use fresh herbs if available (triple the amount).
- Olive oil provides healthy fat and adds to the crispy texture.
- Water content may vary depending on flour absorption—adjust slowly.
- Optional toppings boost flavor, texture, and presentation.
Step-by-Step Instructions
Step 1: Preheat the Oven
Set your oven to 350°F (175°C). Line a baking sheet with parchment paper and set it aside.
Step 2: Combine Dry Ingredients
In a large bowl, whisk together the chickpea flour, garlic powder, dried herbs, salt, and black pepper. Whisking ensures all ingredients distribute evenly and eliminates lumps.
Step 3: Add Wet Ingredients
Add the olive oil and half the water to the dry mixture. Stir using a spatula until combined. Slowly incorporate the remaining water, mixing until the dough is soft and pliable but not sticky.
Step 4: Knead the Dough
Transfer the dough to a clean surface and knead gently for about 30 seconds. You’re not building gluten, just smoothing the texture.
Step 5: Roll Out the Dough
Place the dough between two sheets of parchment paper. Roll it out to about ⅛-inch thickness. Try to make it as even as possible for uniform baking.
Step 6: Score the Dough
Using a pizza wheel or knife, score the dough into square or rectangular shapes. You can also use cookie cutters for fun shapes. Don’t separate the pieces.
Step 7: Brush & Sprinkle
Lightly brush the top with water or olive oil. Sprinkle with optional toppings like sesame seeds or flaky sea salt. Press gently to ensure they stick.
Step 8: Bake
Slide the parchment onto the baking sheet. Bake in the preheated oven for 15–20 minutes. Rotate the tray halfway through for even browning. Look for light golden edges.
Step 9: Rest & Crisp
Once baked, turn off the oven. Prop open the door slightly and let the crackers rest inside for 10–15 minutes. This helps remove moisture and enhances crispness.
Step 10: Cool & Separate
Remove from the oven, let cool completely on the tray, and then gently break along the scored lines. Store in an airtight container once fully cooled.
Side Dish Recommendations
Pairing your garlic and herb chickpea flour snack crackers with delicious sides elevates them from simple snacks to gourmet appetizers. These crispy crackers hold their own in both flavor and structure, making them perfect for dips, spreads, and even light soups. Below are eight complementary sides that enhance the experience, offering a balance of textures, flavors, and temperatures.
Hummus
A timeless favorite, hummus brings creamy contrast to the crispiness of chickpea crackers. Made from chickpeas, tahini, garlic, and lemon juice, its earthiness complements the herbal notes in the crackers. Opt for garlic or roasted red pepper hummus for extra flavor layering. The protein content also adds a satisfying boost.
Baba Ganoush
This smokey eggplant dip is a Mediterranean classic that matches beautifully with the chickpea base. The velvety texture of baba ganoush highlights the crackle of each cracker bite. Garlic in the dip syncs well with the cracker’s own seasoning, while a drizzle of olive oil on top adds richness.
Guacamole
A creamy guacamole adds vibrant freshness. The avocado provides healthy fats, while lime juice and herbs like cilantro offer citrusy contrast to the earthiness of chickpea flour. For a twist, consider adding roasted garlic or charred corn to the guac for a deeper pairing.
Olive Tapenade
This briny, olive-based spread cuts through the nutty flavor of chickpea flour with its intense saltiness. Tapenade often includes garlic, anchovies, and capers, which enhance the savory notes of the crackers. It’s perfect for serving on a rustic platter for guests.
Spinach Artichoke Dip
Warm and comforting, this dip brings creamy texture and a hint of tangy artichoke flavor. Pair it with chickpea crackers for a wholesome, hearty snack. Its garlicky profile is a natural partner to the seasoning of the crackers, and the fiber content keeps things filling.
Soft Cheeses (Goat Cheese or Brie)
For an indulgent touch, spread a creamy cheese over the crackers. Goat cheese adds tang, while Brie offers buttery softness. Both balance the herbaceous flavor of the crackers. Consider a topping of honey or fig jam for a sweet and savory experience.
Tomato Bruschetta
Chopped tomatoes, basil, and garlic tossed in olive oil make a refreshing topping for chickpea crackers. The acidity of the tomato balances the richness of olive oil in the dough, and the herbs harmonize with the seasoning. It’s also a light, healthy side that’s perfect for summer.
Tomato Basil Soup
Crackers and soup are a classic combination. A bowl of tomato basil soup served warm provides a comforting contrast to the crisp texture of the snack crackers. Dip them or crumble into the soup for a crunchy topping. The garlic and herb flavors blend seamlessly into the tomato base.
Nutritional Information & Health Benefits
When you bite into a garlic and herb chickpea flour snack cracker, you’re enjoying more than just flavor. These crackers deliver a solid nutritional profile that aligns with a health-conscious lifestyle. From protein to fiber and essential vitamins, every ingredient in this recipe contributes to your well-being.
Macronutrient Overview
Each serving of crackers offers:
- High protein from chickpea flour
- Heart-healthy fats from olive oil
- Low sugar content
- Moderate carbohydrates
- No cholesterol or trans fats
This makes them a smart choice for anyone seeking balanced energy or following a plant-based diet.
Chickpea Flour Benefits
Chickpea flour is made by grinding dried garbanzo beans. It’s a staple in Indian, Middle Eastern, and North African cuisines and contains:
- High-quality plant protein
- Soluble fiber to support digestion
- Iron, magnesium, potassium, and zinc
- Naturally gluten-free properties
- A low glycemic index, helping manage blood sugar
It also contains resistant starch, which helps improve gut health and supports a healthy microbiome.
Olive Oil Benefits
Olive oil is rich in monounsaturated fatty acids. These fats are linked to:
- Improved cardiovascular health
- Reduced inflammation
- Enhanced skin and hair quality
- Support for brain function
It’s also a great medium for fat-soluble vitamins like A, D, E, and K.
Garlic and Herb Nutrition
Garlic isn’t just a flavor enhancer—it’s a health booster. It has:
- Antioxidant compounds
- Anti-inflammatory properties
- Heart health support
- Natural antibacterial effects
Dried herbs like thyme, rosemary, and oregano are loaded with polyphenols. These compounds help protect your cells from damage and may reduce chronic disease risk. They also contribute trace minerals like calcium and vitamin K.
Dietary Suitability
These crackers fit several dietary needs:
- Gluten-free: Ideal for people with celiac disease or gluten intolerance
- Vegan: Entirely plant-based
- Nut-free: Safe for allergy-friendly kitchens
- Low-sugar: No added sugar or sweeteners
- High-fiber: Promotes satiety and digestion
For those tracking macros or managing conditions like diabetes or PCOS, these crackers provide a snack that’s both satisfying and supportive of health goals.
Common Mistakes to Avoid & How to Perfect the Recipe
Perfecting garlic and herb chickpea flour snack crackers comes down to paying attention to texture, moisture, and baking technique. Below are some frequent missteps and strategies to avoid them.
Mistake: Dough Too Wet or Too Dry
Cause: Incorrect water ratios or overly packed flour
Solution: Add water slowly, one tablespoon at a time. If too sticky, dust in more chickpea flour gradually. The dough should feel like soft modeling clay—malleable, but not sticky.
Mistake: Uneven Dough Thickness
Cause: Inconsistent rolling pressure
Solution: Roll between two parchment sheets and use visual guides or rolling pin rings to maintain even thickness (about ⅛-inch). Uneven thickness causes uneven baking.
Mistake: Underbaking or Overbaking
Cause: Not checking oven heat or ignoring visual cues
Solution: Start checking at 12 minutes. Edges should turn light golden. Rotate the pan for even baking if needed. Underbaked crackers will be soft; overbaked ones may taste burnt.
Mistake: Skipping the Cooling Phase
Cause: Removing from oven and storing too early
Solution: Turn off oven, leave door slightly ajar, and let crackers sit for 10–15 minutes. This step removes moisture and ensures crunch. Store only after fully cooled.
Mistake: Forgetting to Score Before Baking
Cause: Trying to break crackers post-baking
Solution: Score dough with a pizza cutter or knife before placing it in the oven. This helps shape and allows steam to escape through the lines, improving texture.
Mistake: Skipping the Oil or Water Brush
Cause: Toppings fall off, and the surface dries too much
Solution: A light brush of oil or water ensures toppings stick and helps create a smoother, golden surface.
Mistake: Using the Wrong Type of Chickpea Flour
Cause: Texture or flavor issues
Solution: Use finely milled besan or chickpea flour labeled for baking. Avoid coarsely ground types meant for savory fritters.
Mistake: Baking on Bare Sheet Without Parchment
Cause: Dough sticks and breaks apart
Solution: Always use parchment paper. It prevents sticking and makes transferring the dough and removing the finished crackers much easier.
Bonus Tips for Perfection
Taste your seasoning in the raw dough; adjust salt and garlic to preference.
Rest the dough for 10 minutes before rolling to relax any resistance.
Use a cooling rack post-baking to remove moisture from all sides.
Experiment with herbs for new flavor profiles—thyme and smoked paprika work well.
Add seeds like sesame or nigella for extra crunch and nutrition.
Tips, Notes, Storing, and Reheating
These garlic and herb chickpea flour snack crackers are simple to prepare but, like any great recipe, small adjustments can make a big difference in the final outcome. Below are expert-level tips, storage methods, and reheating techniques that ensure each batch turns out perfectly crispy and flavorful every time.
Pro Tips for Better Crackers
- Roll evenly: Uneven crackers won’t bake uniformly. Use visual thickness guides or a ruler if necessary. Thinner = crispier.
- Don’t skip the rest: Letting the dough rest for 10–15 minutes allows the chickpea flour to hydrate, making the dough more pliable and less prone to cracking.
- Use chilled water: Helps reduce stickiness during mixing and rolling.
- Season generously: Chickpea flour has a nutty profile that can handle bold herbs and garlic. Don’t be shy with your seasonings.
- Bake longer for extra crunch: If you like very crispy crackers, turn off the oven after baking and let the tray rest in the residual heat for an additional 5–10 minutes.
- Let cool fully before storing: Even slight warmth when sealed can trap moisture and lead to soggy crackers.
Flavor Variations
- Smoky Paprika + Cumin: Add ½ teaspoon each for a spiced twist.
- Za’atar Blend: Replace the herb mix with 1 tablespoon za’atar.
- Chili Flakes: Add ½ teaspoon to the dough for gentle heat.
- Lemon Zest + Dill: For a fresh Mediterranean profile.
- Black Sesame + Sea Salt: Press into the surface before baking for extra crunch.
- Nutritional Yeast: Add 1 tablespoon to the dough for a cheesy, umami kick.
- Caraway or Fennel Seeds: For a complex aromatic flavor reminiscent of European-style crisps.
How to Store
- Room Temperature: Place cooled crackers in an airtight container. Keep them in a cool, dry space, away from sunlight and humidity. They stay crisp for up to 7 days.
- Avoid Plastic Bags: Use glass jars or tins to retain texture better.
- Separate Layers: If stacking, place parchment between layers to prevent sticking or breakage.
- Freezer Storage: For long-term storage, freeze crackers in a single layer first, then transfer to a sealed container. Thaw at room temperature; re-crisp in the oven if needed.
Reheating and Re-Crisping
- Oven Method: Preheat oven to 300°F (150°C). Place crackers on a baking tray and heat for 5–7 minutes. This removes any absorbed moisture.
- Air Fryer: Heat at 300°F for 3–4 minutes. Watch closely to prevent over-browning.
- Avoid Microwave: It introduces moisture and results in a soft, rubbery texture.
Serving and Pairing Notes
- Appetizer Platters: Stack with cheeses, olives, dried fruits, and nuts.
- Soup Toppers: Crumble over tomato basil or creamy lentil soup.
- Lunchbox Snacks: Pack alongside fruit and hummus for a balanced mini meal.
- Entertaining: Arrange in rustic baskets with assorted dips for a crowd-pleasing starter.
Frequently Asked Questions (FAQs)
Are chickpea flour and besan the same?
Yes. Both refer to flour made from ground chickpeas. However, in some regions, “besan” is made from split brown chickpeas (chana dal), while chickpea flour in the West often comes from white chickpeas (garbanzo beans). Both work for this recipe.
Can I substitute other flours?
You can experiment with rice flour, oat flour, or a gluten-free all-purpose blend. However, substitutions will change the flavor and texture. Chickpea flour is high in protein and absorbs moisture differently than grain-based flours.
Why are my crackers chewy and not crispy?
This usually results from underbaking or rolling the dough too thick. Make sure the dough is rolled evenly and thinly, and allow crackers to cool completely in the oven with the door ajar to remove excess moisture.
Can I make these crackers oil-free?
Yes, but the texture will be slightly different. Replace olive oil with unsweetened applesauce or aquafaba. The crackers will still be flavorful but might lack some crispness.
How long do they stay fresh?
Stored properly in an airtight container, these crackers stay crisp for about 7 days at room temperature. For longer storage, freeze and re-crisp before serving.
Are they good for dipping?
Absolutely. These crackers are sturdy enough for thick dips like hummus, baba ganoush, or cream cheese spreads. Just make sure to cool them fully so they don’t crumble during dipping.
Can I double or halve the recipe?
Yes. The recipe scales easily. When doubling, divide the dough into two batches for easier rolling. When halving, keep a close eye on baking time—it may bake quicker.
Can I make the dough ahead?
Yes. Wrap it in plastic or store in an airtight container and refrigerate for up to 24 hours. Let it come to room temperature before rolling to avoid cracking.
Can I add fresh herbs?
Definitely. Use three times the amount of fresh herbs compared to dried. Chop finely and blend into the dough. Fresh rosemary or thyme work particularly well.
Can I use this as a pizza base?
Not ideal. The dough is crumbly and lacks the elasticity needed for a pizza crust. It’s best used for crackers or crisp flatbread variations.
Conclusion
Making your own garlic and herb chickpea flour snack crackers is a rewarding and nourishing experience. With minimal ingredients and endless customization options, they fit perfectly into healthy lifestyles and special diets alike. From the first crunch, you’ll notice the difference fresh herbs and garlic make when paired with the nutty warmth of chickpea flour.
Whether you’re serving these crackers with dips, packing them for lunch, or offering them at a party, they’ll stand out for their flavor, texture, and wholesome simplicity. They’re naturally gluten-free, vegan, and endlessly snackable.
Try out the variations, pair them with your favorite sides, and make them part of your weekly meal prep. Once you’ve made a batch from scratch, store-bought crackers will never compare.
Let your creativity run wild—experiment with flavors, share with friends, and enjoy every crunchy bite.


Leave a Comment